Note: if you’re in Colorado, call Advantage Stone Fabrication for your granite countertop installation or to answer any questions you have about custom countertop fabrication.
Starting a kitchen renovation can be exhilarating, especially when it involves the installation of a granite countertop. This natural stone, brimming with unique colors and veins, can truly transform your kitchen into the space you’ve always envisioned.
Granite countertop installation isn’t a quick or easy task, but it’s a worthwhile investment in your home. It’s a process that requires meticulous planning and execution. Knowing what to expect can help you prepare accordingly, ensuring a smoother transition for everyone involved. So, let’s delve into what this process looks like and what you need to do before the installation team arrives.
Getting Ready for the Granite Countertop Installation Team to Arrive
As the day of your granite countertop installation approaches, it’s essential to prepare your space. First things first, ensure that there’s a clear pathway for the installation crew. Remember, they’ll be hauling stone pieces anywhere from 200 to 800 pounds. The path from the truck to your kitchen needs to be obstacle-free. It’s not just about making the job easier for the installers; it’s about ensuring maximum safety.
Your kitchen will also need some attention. Remove all the top drawers from your cabinetry to provide easy access to the underside of your new countertops. The installers require this level of access to secure the countertop properly. By taking these steps ahead of time, you’re not only making sure the installation goes smoothly but also showing appreciation for the craftsmen’s hard work.
It’s best to stay nearby during the process. While our teams work efficiently, we understand you might have questions. Don’t hesitate to ask these either before or during installation. After all, communication is key to understanding this meticulous process and helping it run like a well-oiled machine.
Ensuring the path is clear, prepping your kitchen, and getting your questions ready are crucial steps as you prepare for the arrival of your installation team. Your readiness plays a considerable part in making this installation an efficient and successful one! In the end, we want you to have a positive experience and, ultimately, a countertop you’re proud to show off.
What Should You Do During the Installation?
Being present during the granite countertop installation is essential. This way, you’ll be available to answer any questions the installers may have and ensure everything goes as expected. Let me share some pointers on how to navigate this stage of the process.
Ensure Child and Pet Safety: Now, a note of caution here—keep small children and pets away from the area during the installation process. The team will likely be in and out of your home, carrying heavy stone and tools. Removing this distraction will help the team concentrate on the job and importantly, ensure the safety of your loved ones.
Handle Existing Countertops: If you currently have countertops in place, don’t worry, the professional installation team is equipped to handle their removal. The process might create a bit of dust, especially if a new cooktop is being installed. To combat this, I’d suggest covering nearby furniture and belongings. Trust me, a little prep work can save you a lot of cleaning time down the line.
Being alert and active during the installation will go a long way in ensuring an effective and successful granite countertop installation. Be prepared, be proactive, and most importantly, don’t hesitate to ask questions or clarify doubts with your installation team. Remember, this renovation represents an investment in your home—a little effort now will pay dividends down the road in your enjoyment of the new space.
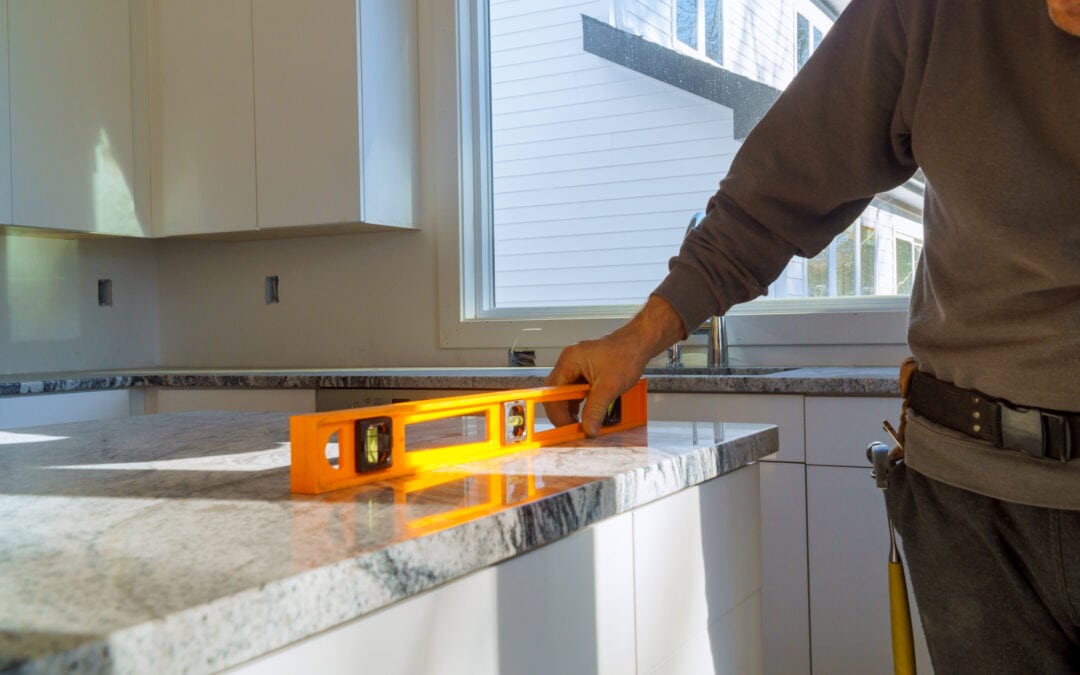
Granite Countertop Installation: Ensuring That Every Cabinet is Level and Secured
A significant part of the granite countertop installation process involves ensuring that every cabinet is level. Correctly leveling the cabinets during installation ensures longevity of your countertops — potentially reaching the lifetime of your home.
If cabinets are completely out of level and the unevenness cannot be corrected by shims placement under the new granite countertops, then there’s a bit of a snag. The cabinet contractor needs to level the cabinets. Such a situation can be pretty frustrating for homeowners while also leading to a waste of labor time for the granite company.
Once the cabinets are found within the acceptable range, our skilled installation team will place the granite pieces on the counters. They’ll use epoxy at the seams to bind the pieces of marble, granite, soapstone, or quartz to each other. Ever wonder what happens if the cabinets aren’t level? In some cases, small wooden shims can offset minor variations in the plane during the countertop installation. These wood wedges, cut specifically for home improvement purposes, can correct minor discrepancies.
Another crucial step, especially for undermount sink installations, involves attaching a rail or clip system to keep the sink snug and secure under the granite. Most homeowners opt for an undermount sink — it’s indeed the prevalent choice. Equipped with years of experience and specialized training, our staff knows how crucial this step is.
Countertop Installation: Putting the Granite in Place, Setting the Seams, and Caulking
An essential part of granite countertop installation involves the process of placing the granite, setting the seams, and caulking. This process gets more complex if the countertop comes in two or more pieces.
The initial step usually involves filling in the seams with a strong adhesive. After the adhesive has fully dried, the granite countertop gets attached to the cabinetry using either caulk or silicone. As a point of interest, if a cooktop hole is required for your kitchen setup, the installers may leave this task until the day of installation.
The stone will then be set and any excess epoxy or caulk will be cleaned off with denatured alcohol or acetone. Once the surface is clean, sealing of the counters takes place. This process is crucial to maintain the countertop’s durability and appeal. You’ll receive instructions on how to care for your granite countertops from your installers, follow these carefully to ensure a long lifespan for your countertops.
The installation team will use a template created from your countertop. This will guide the cutting process and help ensure a snug fit. Once the granite is glued down and in place, each seam will be sealed with a colored resin. This matches the granite and keeps water from leaking between the countertop and the sink.
Ultimately, an important thing to remember is that no wall is perfectly straight, not even in new homes. So, some minor adjustments may be required to achieve a perfect fit. A professional team will handle these challenges seamlessly, ensuring a stable and aesthetically pleasing result.
Backsplash & Cooktop Cutout
Renovating your kitchen often comes with important considerations. When installing a granite countertop, you’ll have a few additional tasks, particularly when it comes to the backsplash and any cutouts needed for your cooktop, faucet, or soap dispensers.
Cutout Preparations for Cooktops, Faucets, and Soap Dispensers
If you’re using a cooktop instead of a slide-in range, be prepared for significant cutout work. Getting the cutouts right is crucial. Cutting a large hole in a stone countertop for a cooktop can be a risky task. Often, doing this before transportation can lead to breakages. Therefore, drilling and cutting for such necessities might happen on-site or ahead of time. But what about the dust that comes from the stone during this process?
Dust Management During Installation
Dusting is an inevitable part of the installation process. However, with experienced installers, they tend to take serious measures to manage dust effectively as well as clean up the mess afterwards. While you can anticipate some dust from the stone, it should be a controlled situation, not an invasion of your living space.
Installation of an Undermount Sink
Where undermount sinks are involved, these are typically mounted to the underside of the stone slab using durable clips. As an extra layer of protection, silicone is applied after mounting to create a watertight seal. This requires adequate curing time – roughly 12 hours – before connecting the additional plumbing and faucets.
Granite Countertop Installation – Final Steps
Once your granite countertop is secure and all appliances have been mounted, there are a few finishing touches required. The level and firmness of your new countertop are evaluated, which is essential for the long life of the counters. Any residual epoxy or dust from the installation is cleared with acetone or denatured alcohol to ensure smooth, clean seams.
Throughout the installation process, there’s a consistent focus on fostering a flawless countertop, ensuring it lasts a lifetime. Dive into the next part of our article to explore more insights related to granite countertop installation.
Wrapping up the Details and Cleaning Up
Now that granite countertop installation progresses further, unwinding and piecing together the final intricacies of the process becomes essential. It’s important to shed light on a few specifics – the way epoxy is put into use, the role attachment blocks play, and how the stone fabrication methods affect the installation.
A couple of different types of epoxy are available – clear and neutral, both colored and blended on-site to match the countertop by the installation team. The team will ensure the smoothest seam possible by skillfully skimming any excess epoxy with a razor blade once dry.
How are granite counters secured to the cabinets you may ask? With the help of specially prepared attachment blocks called bondo blocks. A noteworthy fact here – not a single wall is perfectly straight, not even in brand new homes. Therefore, during measurements, all wall imperfections are taken into account by the digital templating system to scrupulously scribe these on the backside of the granite counters.
Techniques like those used by Advantage Stone Fabrication, despite being considered best practices, may sometimes leave minor gaps between the counters and the wall. However, don’t fret; every tiny gap is completely covered up by your tile or granite backsplash!
Reaching the final stages of granite countertop installation, unexpected adjustments to the stone may need to be made on-site, since transporting uncut granite ensures safety. This finale to the process means there will be stone dust. So, preparing the house by dustproofing, covering furniture, and putting the food away aids in creating a pleasant environment for you. The installation team assures a professional job, each detail in accordance with the code.
How Long It Takes from Start to Finish of Granite Countertop Installation
Granite countertop installation isn’t a quick, one-day project. It requires preparation, patience, and professional expertise. Remember, it’s crucial to clear pathways and remove drawers for easy access.
Be prepared for minor wall damage when removing old countertops, but don’t worry – a new backsplash can easily hide these. Ensure your cabinets are level for longevity and don’t shy away from asking questions during the process.
And don’t forget about the importance of sealing your counters to maintain their durability and appeal.
For more information about natural stone countertop installation, you can reference this guide from the National Stone Institute. The guide provides comprehensive details on installation procedures, necessary precautions, and maintenance practices that ensure your granite countertops remain as stunning as they are durable. It’s an invaluable resource for homeowners looking to invest in quality countertops.